Advanced Telescope Supplies
Astrophotography
Advanced Telescope Supplies does not sell many astrophotographic accessories. Many of these are available from many USA dealers directly by mail for less than we can obtain them. Likewise, a photographic store is a good place to obtain a good 35mm camera. When you wish to move up to auto-guiding, deep-sky imaging, or CCD work, then we can help with precision mountings, CCD cameras and guiders.
 Astrophotography is perhaps one of the most
challenging and rewarding aspects of amateur astronomy. The easiest place to
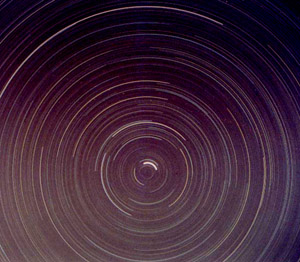
start is to record "star trails", being the apparent motion of the
stars as the earth rotates.
Astrophotography is perhaps one of the most
challenging and rewarding aspects of amateur astronomy. The easiest place to
start is to record "star trails", being the apparent motion of the
stars as the earth rotates.
You can also use a fixed camera to record Bright Comets.
You can photograph the constellations but will need to use high speed film to avoid trailing that will result from exposures of more than a few seconds. Be wary of opening up the F-Stop too much. Stars at the edge of an F1.4 field often look like seagulls. Try stopping down one to two F-Stops.
Photographing star trails and constellations during a full moon on near bright city lights will also cause your exposures to be washed out. A dark moonless country sky will give the best results.
At regular intervals throughout the year, the earth is bombarded by meteor showers, these too can be successfully recorded by a simple camera and tripod setup.
| Fixed Camera Astrophotography | Equipment required |
| Star trails | 35mm Single Lens Reflex Camera with "B" (time exposure) setting, Cable release, Tripod Exposure time 5-10 minutes to many hours (a very dark sky is required for very long exposures) |
| Constellations | 35mm Single Lens Reflex Camera with "B" (time exposure) setting, Cable release, Tripod, High speed film (ISO400 or higher). Try bracketing the exposures from 1 to about 20 seconds. |
| Meteors | 35mm Single Lens Reflex Camera with "B" (time exposure) setting, Cable release, Tripod, High speed film (ISO400 or higher), Wide angle lens. Exposure times around 5-10 minutes. |
Where do I purchase equipment for this type of astrophotography? Any good photographic store.
The next stage most astrophotographers want to progress to is to take pictures through their telescopes. Unfortunately in most cases you can not simply attach a camera to the telescope, click the shutter and expect a result. The two exceptions being the Sun (filtered with an aperture solar filter) and the moon. In either case, the subject matter is bright enough to take exposures that last a fraction of a second with your telescope acting like an ultra-telephoto lens.
There is also a camera which stands out from the pack as
being ideal for astrophotography. The Olympus OM-1. Though no longer
manufactured, they can be found for affordable prices in second hand stores. It
features a purely mechanical shutter,
interchangeable viewfinders and a reflex mirror which can be
locked up prior to exposure. No matter what camera you use, you will need the
following accessories
- A camera to telescope adapter (sometimes called a prime focus or T- adapter)
- An equatorial mount with at least a single axis drive system
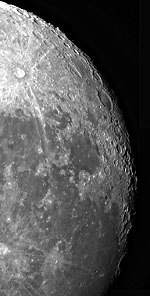
Photographing The Moon
 General considerations:
To obtain high resolution views you need to
employ long focal lengths and as a result will need a telescope with at
least a single axis (RA) motor drive. To capture the moon as a whole, focal
lengths of around 750 mm to 1250 mm will frame the moon nicely on a piece of 35
mm film.
General considerations:
To obtain high resolution views you need to
employ long focal lengths and as a result will need a telescope with at
least a single axis (RA) motor drive. To capture the moon as a whole, focal
lengths of around 750 mm to 1250 mm will frame the moon nicely on a piece of 35
mm film.
- As a guide each 1000 mm of focal length corresponds to about 10 mm of image diameter of the moon on the film.
- Images of individual craters, lunar highlands and rills etc. will require a lot more focal length, around 3000 mm and up depending upon how "close" you want to get to the subject. As a rule the closer in you get, the less light you have to play with, so do not be surprised if exposure times run into 5-6 seconds for extremely high resolution work. This then makes your images sensitive to blurring from:
- poor tracking (having lunar rate on your telescope drive helps)
- vibrations,
- wind buffeting,
- turbulence in the earth's atmosphere and
- the mechanical action of the shutter within the camera .
| Lunar Photograph | Equipment |
| Full moon or its phases: | Long telephoto or small telescope, tripod, prime focus camera adapter, T-ring for camera and cable release |
| Lunar seas and craters: | Medium to large telescope (2000 mm and up focal length). Motor driven equatorial mount, prime focus camera adapter, T-ring for camera and cable release |
| Small groups of, or individual craters: | Medium to large telescope, motor driven equatorial mount with lunar rate, camera, cable release eyepiece projection tube (sometimes called a tele-extender), telescope eyepiece T-ring for camera and cable release. |
Film: No hard and fast recommendations here.
Colour and Black and white negative films have better exposure latitude than do
transparency films, which despite being more difficult to expose accurately,
look fantastic when projected. Experiment.
Tech
Pan 2415 or Kodachrome for those who demand the highest resolution.
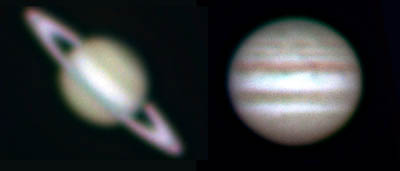
Photographing The Planets
 General considerations:
To get even the largest of the planets to form a
reasonably sized image on 25mm film you need to employ very long focal lengths
i.e. around 4,000mm to 20,000mm.
General considerations:
To get even the largest of the planets to form a
reasonably sized image on 25mm film you need to employ very long focal lengths
i.e. around 4,000mm to 20,000mm.
Very few telescopes have such long focal lengths, but they can be achieved by using a technique called eyepiece projection or by a powerful barlow lens.
Eyepiece projection uses an adapter and tube to hold an eyepiece
in front of the camera adapter, which literally projects the image of a planet onto the film. Newer Barlow lens designs (such as the TeleVue powermate) also can multiply a telescope's focal length by up to 5x, being and ideal amplification of focal length for many Schmidt Cassegrain telescopes.
For successful planetary photography you also need:
- Nearly perfect polar alignment
- use high quality equatorial mount
- focus as accurately as possible
- do not attempt planetary photography with bad "seeing", you will simply be wasting film.
Equipment:
Medium to large telescope, motor driven equatorial mount, camera, cable
release
eyepiece projection tube (sometimes called a tele-extender), telescope
eyepiece
T-ring for camera and cable release. Try using "stacked" 2x photographic
teleconverters. CCD's have largely
replaced film for exacting amateur work
Film: Tech Pan 2415, Fuji 400, Kodachrome 25
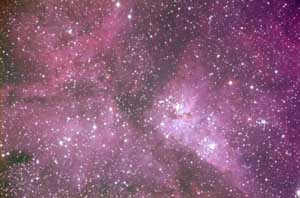
Photographing Galaxies, Nebulae, Globular Clusters etc.
 General considerations:
Some people call these "Deep Sky" objects. They all
require some way of getting as much of their distant light (from deep
space, get it?) to register on your film as is possible. There are three
tools you can use: long exposures, large apertures, fast film. Long exposures
mean gravity will affect your equipment. Honest, we're serious. Its called differential flexure. In short, equipment components will move, sag or
slip minute distances and mysterious and often unpredictable ways during the course of a prolonged
exposure. This will invariably ruin the image by causing elongated or possibly
double stars plus cause you a good deal of
frustration.
General considerations:
Some people call these "Deep Sky" objects. They all
require some way of getting as much of their distant light (from deep
space, get it?) to register on your film as is possible. There are three
tools you can use: long exposures, large apertures, fast film. Long exposures
mean gravity will affect your equipment. Honest, we're serious. Its called differential flexure. In short, equipment components will move, sag or
slip minute distances and mysterious and often unpredictable ways during the course of a prolonged
exposure. This will invariably ruin the image by causing elongated or possibly
double stars plus cause you a good deal of
frustration.
One can shorten the exposure by using high ISO film, which can also
be hypersensitized.
Collecting more light via a large aperture helps, but bigger aperture, means
more mass, more gravitational attraction, I'm sure you get the idea. Gravity's
natural enemy is called the "off axis guider" . These handy devices come in many
forms: 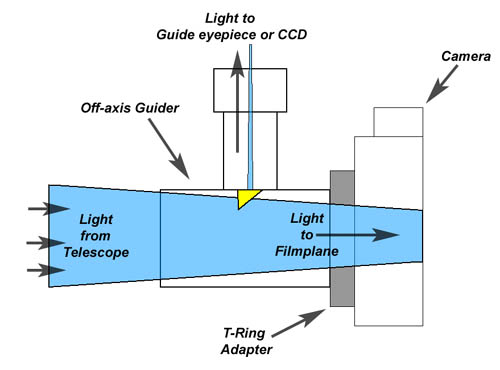
-
EZGuider and Giant EZGuider (Lumicon),
-
Radial Guider (Celestron),
-
Off-axis Guider (Meade).
-
Taurus Tracker 3 by Taurus Technologies
Off axis guiders work by using a pick off prism or mirror to collect a small amount of light from the edge of the field of the main telescope optics, and letting the remainder pass through to the film plane. Hence if there is any sag or shift in the main optics, this will be compensated for, as the guider "sees" what the camera "sees". The "best of the bunch" is probably the Taurus Tracker 3 by Taurus Technologies, New York, USA (see any post 1997 Sky and Telescope magazine for their advert). This unit is not only an off axis guider, but also allows you to see and focus the object of interest through a normal eyepiece, prior to taking the exposure.
Specific techniques:
An off axis guider has a pick-off prism or mirror which directs a small portion of the incoming light cone of from the main telescope to a guiding port or tube, in which you can place any of the following: an illuminated reticule eyepiece or a projection reticule and eyepiece or a CCD autoguider. Many ask the question, won't this prism cast a shadow on the film? While some off-axis guiders do just that, the effect is more like vignetting rather than a hard shadow, secondly most designs take light from the edge of the telescope light cone which does not fall on the film plane.
The camera must be focused, and there are some devices that will help here. Spectra Astro systems "Suresharp", Celestron focal tester give very accurate results, but one can also use viewfinder magnifier accessories available for some cameras with good success. Once the camera is focused, you'll need to find and focus on a suitable "guide star" in the guiding eyepiece.
Move the guiding eyepiece up or down in its holder to achieve its best
focus (there are several kinds of guiding eyepiece commercially available, but
many have illuminated double crosshairs as seen right). You'll probably have to rotate the entire off axis guider to find a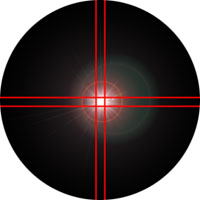 suitable guide star. Once you have a guide star, use the hand paddle of your telescope's dual
axis drive corrector to center it on the guiding cross hair (some
illuminated reticles will allow you to move the cross-hair reference to the guide star
without moving the telescope). Once centered, trip open the shutter of your camera
(using a cable release and the camera on "B" or its time exposure setting) and
while the shutter is open, use your dual axis hand paddle to keep that guide
star on the crosshair. Guide for as long as you like, 20 to 40 minutes is the
limit for most sane individuals, alternatively, use an autoguider as it will
have better attention span for this sort of task than most humans.
suitable guide star. Once you have a guide star, use the hand paddle of your telescope's dual
axis drive corrector to center it on the guiding cross hair (some
illuminated reticles will allow you to move the cross-hair reference to the guide star
without moving the telescope). Once centered, trip open the shutter of your camera
(using a cable release and the camera on "B" or its time exposure setting) and
while the shutter is open, use your dual axis hand paddle to keep that guide
star on the crosshair. Guide for as long as you like, 20 to 40 minutes is the
limit for most sane individuals, alternatively, use an autoguider as it will
have better attention span for this sort of task than most humans.
| Equipment: |
Medium to large telescope, equatorial mount with dual axis drive, off-axis
guider camera and T-ring, cable release, illuminated reticule eyepiece or
auto-guider.
Note on auto-guider: The SBIG STV is highly recommended. |
|
Film:
|
Tech Pan 2415, Fuji 400, Kodak PPF 400. |
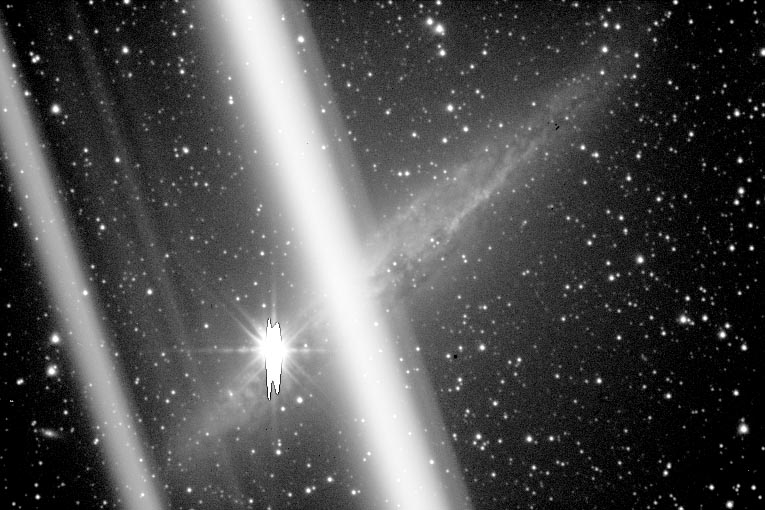
Astrophotography can be very rewarding, but things can go wrong. Car headlights, inquisitive neighbours, furry animals, static electricity, poor tracking, failed batteries, poor focus,development failures and low flying aircraft as in the example below can give you an idea of but a few potential problems! Just remember, use reliable equipment, and be prepared!